Help
Everything you need to know about recording, reviewing, and managing calls with aftercalls. This page is open to everyone — share the link freely. Product screenshots are refreshed periodically and reflect the UI as of early 2026.
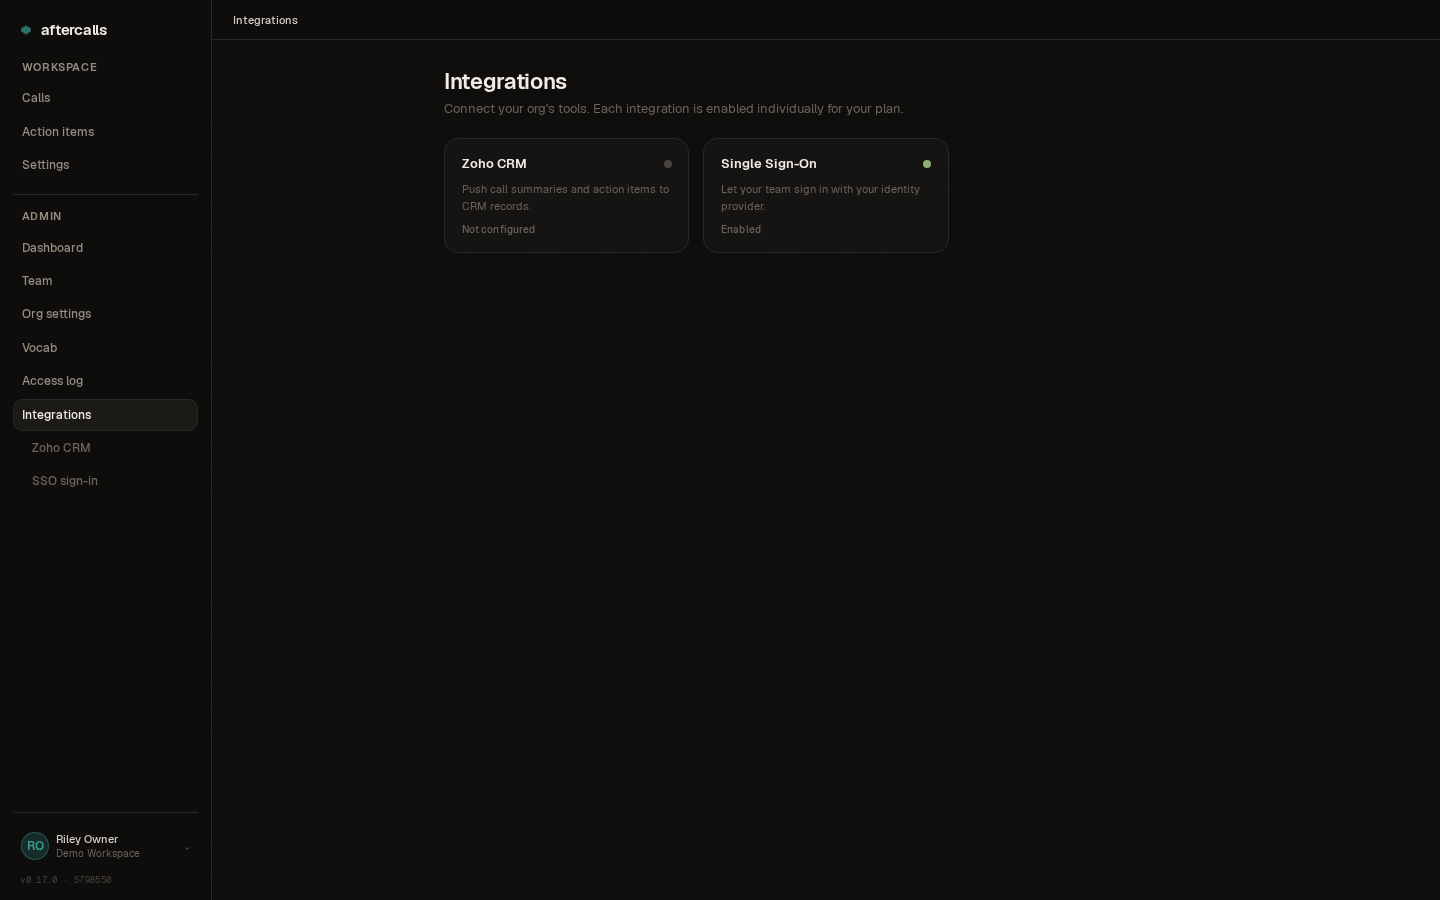
Web portal overview
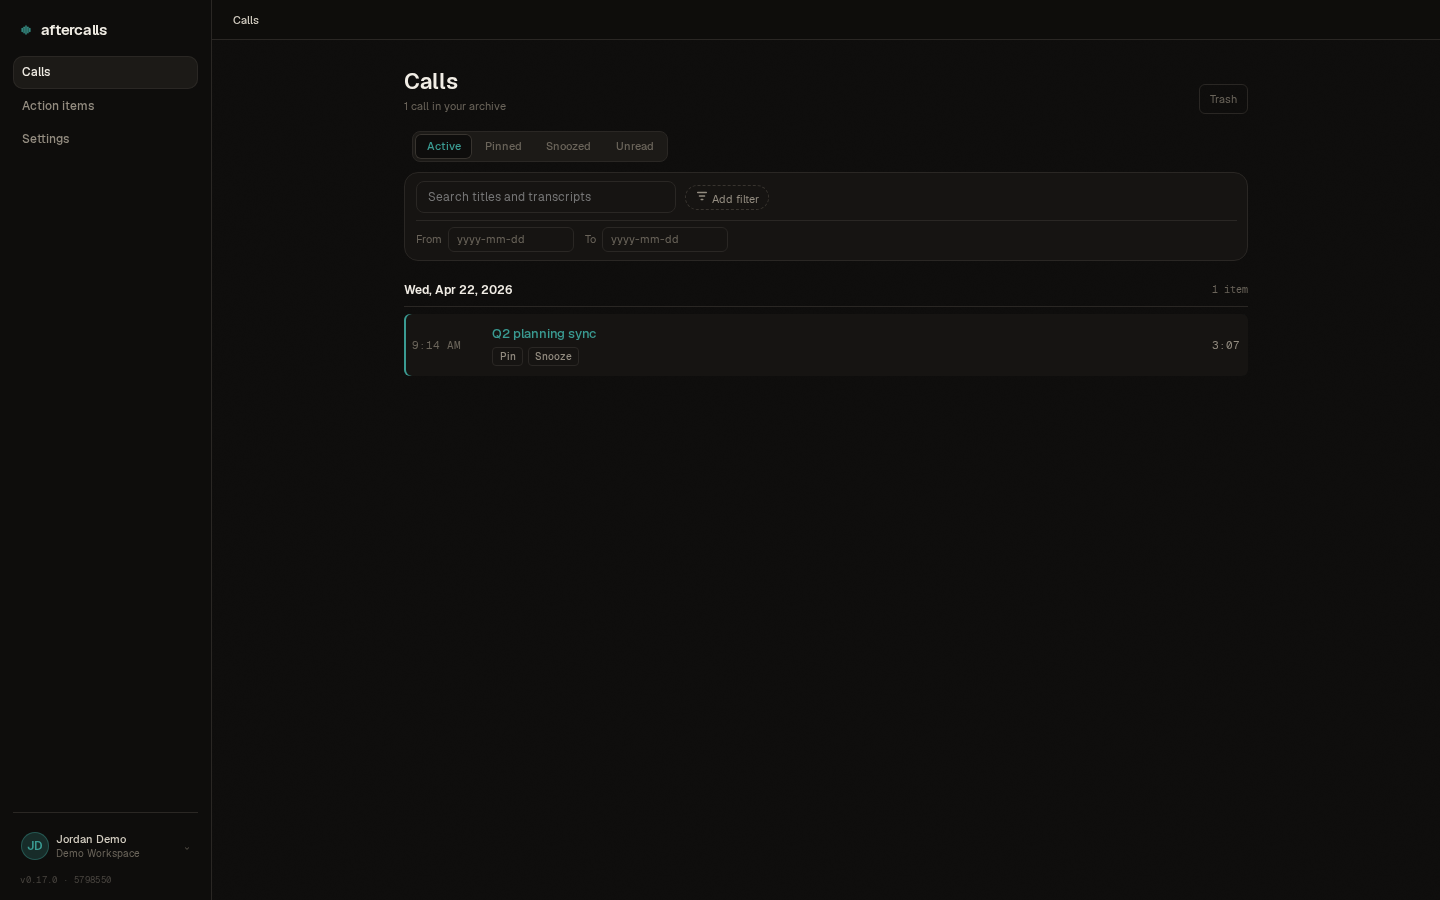
Signed-in users at app.aftercalls.io manage calls from the Calls list, open each recording on its own page, and visit Action items for follow-ups extracted from transcripts (with due dates, assignees on team plans, and done/open filters).
Tags on a call (for example customer or billing) make the list searchable and help everyone on the team find patterns. Admins can define an org vocab so suggested tags stay consistent.
Shared links let you send a read-only view of one call to someone outside the org (with optional transcript, summary, and audio toggled per link). Create a link from the call page; revoke it anytime from the same place.
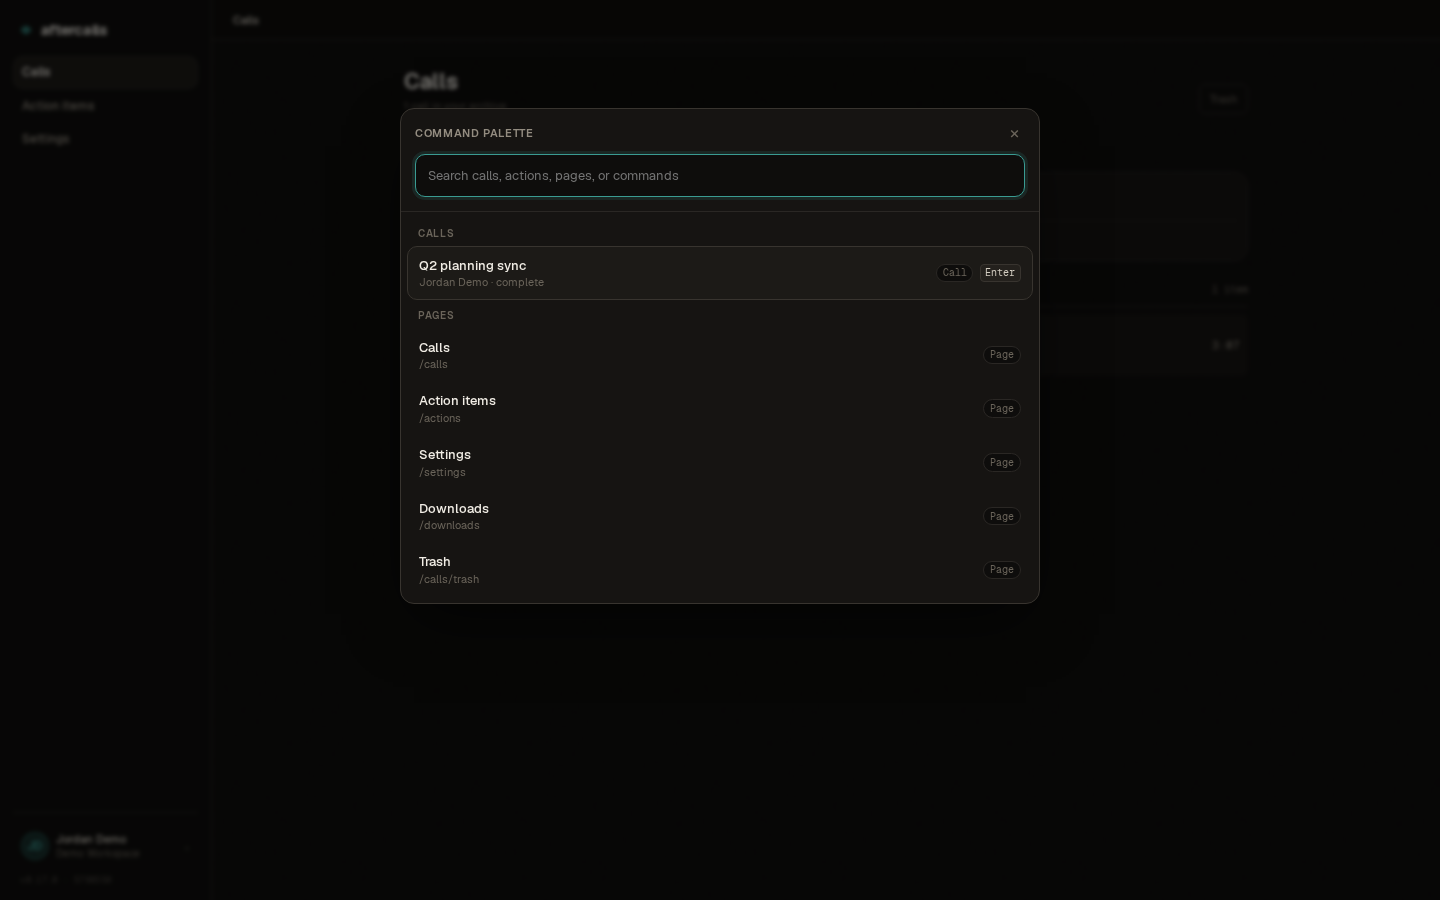
Search, saved views, and the command palette
The Calls list is filterable by tag, person, customer, meeting type, and date range. Build a filter set you run weekly — for example "this month, customer = Acme" — and click Save view to keep it as a one-click button above the filters. Saved views appear in the command palette so you can jump to "Acme this month" from anywhere in the portal. Manage saved views from the Save-view menu.
Open the command palette with ⌘K on macOS or Ctrl+K on Windows and Linux. It lets you jump to a specific call by name, switch to a saved view, navigate to admin pages, or invoke common actions without leaving the keyboard.
Unread calls
When a teammate's call lands in the shared archive, it appears with an unread indicator — a small accent bar next to the call in the Calls list, plus an Unread filter at the top of the page — until you open it. On the desktop app, the system tray icon shows a count of how many calls in the archive you haven't read yet so you can see at a glance whether anything new has come in.
Opening a call clears its unread state for you only — your teammates' unread states are independent. If you want to mark a call as read without opening it, use the right-click menu on the row in the Calls list.
Action items page
The Action items page shows a list of follow-ups pulled from your calls. Each item has a due date and an assignee (on team plans) and can be marked done or left open. You can snooze items that aren't ready yet — they'll reappear on their due date or when you're ready to tackle them.
On the page you can switch between Mine (your action items only) and All team (everyone's items) if you're an admin. Search by due date or use the filter row to narrow the list.
Sharing a call
The Share button on any call generates a secure public link — recipients see the transcript, summary, audio, and action items in a read-only view. No aftercalls account required to view a shared link.
When you share, you can set an expiry (7 days, 30 days, or never) and toggle which sections are visible (summary only, full call details, or custom). You can see how many times each link has been viewed and revoke any link anytime — revoked links return a "not available" message to anyone who tries to open them.
Tags and filtering
Add tags to calls (for example customer, billing, urgent) to make them searchable and help your team spot patterns. Tags live on the Calls page as filter buttons — click one to show only calls with that tag.
Admins can define an organization vocab to suggest consistent tags across the team. Admins can also add a client-name allowlist (in Settings → Organization → Clients) so that customer names in summaries aren't wrapped in chips — they render as plain text instead.
Highlight to correct
Highlight any word in a transcript or summary, then type a replacement. You can fix just that one occurrence or everywhere in the call. The changes cascade: transcript, summary, action items, and participant names all update without a page refresh.
This is useful for fixing name mistakes, correcting mishearings from transcription, or tweaking terminology in the summary.
Offline indicator
A small indicator at the top of the web portal shows when your internet connection drops. While you're offline, any edits you make to notes and action items are saved locally. When you're back online, those changes sync automatically — no data is lost.
Recordings on the desktop app continue to your device regardless of your connection.
Signing in
New users are invited by an org admin. You'll receive an email with an invitation link — open it, pick a display name and password, and you're in. Existing users sign in at app.aftercalls.io/login.
The first time you sign in you'll see a Terms of Service and Privacy Policy acceptance page. Check both boxes to continue. You only see this page when a new version is published.
If your org admin has enabled single sign-on, you can sign in with your work identity instead of a password.
Sign in with single sign-on
On the login page, click Sign in with single sign-on below the email field, pick your provider (Google Workspace, Microsoft Entra, or Zoho), and consent. You'll land in aftercalls signed in as your work identity — no password to remember on this side.
Manage which methods are linked to your account in Settings → Account. If single sign-on isn't available on the login page, your org admin hasn't enabled it yet — ask them, or sign in with your email + password instead.
Enterprise SSO (operator setup)
This section is for self-hosted operators wiring SSO at the platform level. End users sign in via single sign-on — that's the customer-facing flow.
Enterprise SSO lets your team sign in to aftercalls with their existing identity provider. We support Google Workspace, Microsoft Entra, and Zoho. SSO is a per-org premium feature — your aftercalls account team enables it for your org from the staff console.
Self-hosted operators: SSO is configured at the platform level, not per-org. Register one OAuth app per provider you want to support, set the env vars on your backend deploy, restart. End users then see "Sign in with single sign-on" on the login page and pick a provider.
Google Workspace
- Open console.cloud.google.com → APIs & Services → Credentials → Create credentials → OAuth client ID → Web application.
- Add
https://api.aftercalls.io/v1/auth/sso/google/callbackas an authorized redirect URI (replace the host with your own deploy). - Copy the client ID + secret and set
GOOGLE_OAUTH_CLIENT_IDandGOOGLE_OAUTH_CLIENT_SECRETin your backend's.env.
Microsoft Entra
- Open portal.azure.com → Microsoft Entra ID → App registrations → New registration.
- Choose "Accounts in any organizational directory and personal Microsoft accounts" if you want multi-tenant; otherwise restrict to your tenant.
- Add
https://api.aftercalls.io/v1/auth/sso/microsoft/callbackas a Web redirect URI. Generate a client secret under Certificates & secrets. - Set
MICROSOFT_OAUTH_CLIENT_ID,MICROSOFT_OAUTH_CLIENT_SECRET, and (if you restricted to a tenant)MICROSOFT_OAUTH_TENANT— otherwise the defaultcommonworks.
Zoho
- Open api-console.zoho.com → Add Client → Server-based Application.
- Set the authorized redirect URI to
https://api.aftercalls.io/v1/auth/sso/zoho/callback. - Copy the client ID + secret and set
ZOHO_SSO_CLIENT_IDandZOHO_SSO_CLIENT_SECRETon your backend. - Note: this is distinct from the Zoho CRM / Meeting / Cliq integration credentials, which use their own env vars.
Restart the backend after setting any of these. The login
page calls GET /v1/auth/sso/providers to find
out which providers are configured and renders only those.
A misconfigured provider (missing var, wrong redirect URI)
surfaces at the consent screen rather than logging the
user in silently.
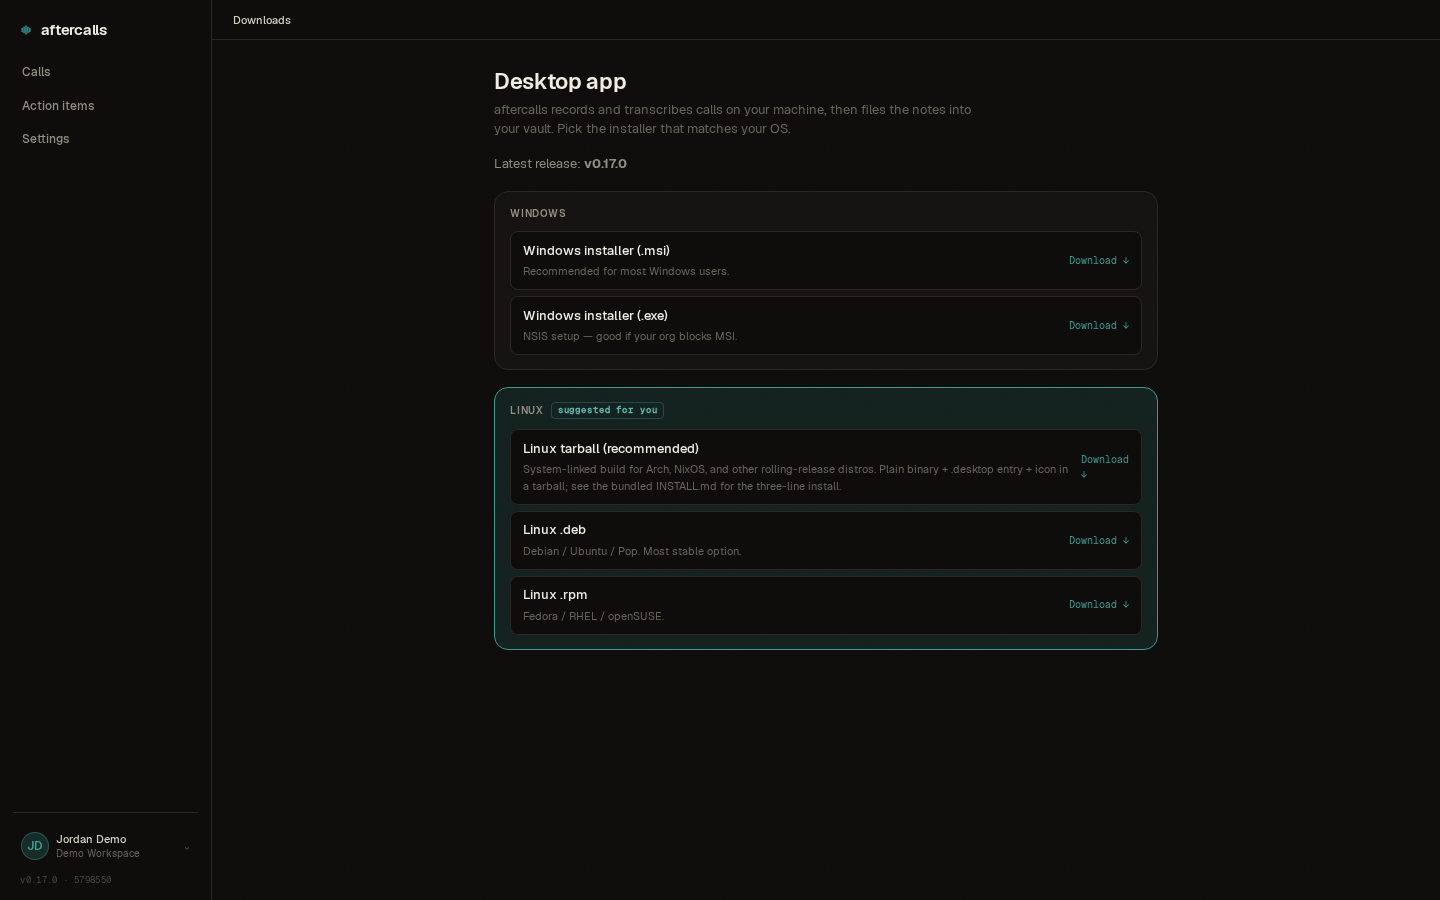
Install the desktop app
Grab the installer for your OS from the downloads page:
-
Linux: AppImage (recommended — in-place
updates with one click),
.debfor Debian / Ubuntu / Pop,.rpmfor Fedora / RHEL. All requirelibwebkit2gtk-4.1+libgtk-3. -
Windows:
.msi(recommended) or.exe(NSIS). -
macOS: the
.dmg— drag to Applications.
Updates
The agent checks for new versions on launch and every few hours in the background. When a build is available you'll see a pill at the top of the window:
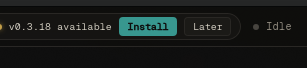
Install downloads the new build and swaps it in place — on Windows and the Linux AppImage the app relaunches itself once the download is done, so there's nothing to click after that. Later dismisses the pill for this session; you'll see it again next launch.
On Linux with the .deb, .rpm, or
tarball install, in-place swap isn't possible. The pill
still appears, but clicking Install opens
the downloads page so you can grab the new package and
install it the same way as before.
Record your first call
Launch the desktop app, sign in with the same credentials you use on the web, and click Start recording. The red Stop button appears with a timer. When you stop, the app uploads, transcribes, summarizes, and files the note — the moment the transcript is ready, "Open in app" and "Open on web" buttons surface so you can start reading while the rest finishes.
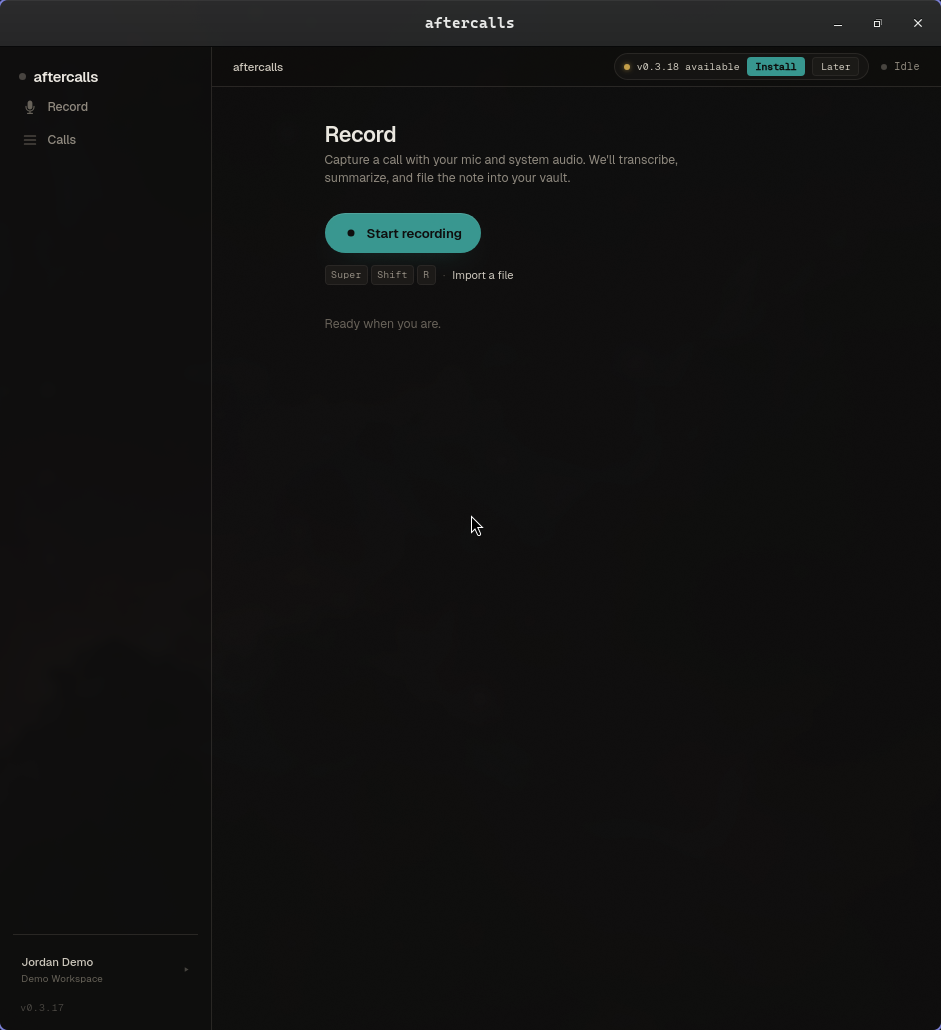
Manual recording
On the Record tab, click Start recording or press Super+Shift+R. The global shortcut works even when the app is in the tray, so you can record from anywhere in your workflow.
The app records your microphone and your computer's system audio into separate tracks. The "mixed" track is both sides combined; "You" / "Others" are the individual halves.
Global shortcut on Linux
On most Linux desktop environments the in-app
Super+Shift+R shortcut only
fires while aftercalls is focused. To toggle recording from
any window, bind the shortcut to
aftercalls --toggle-recording in your desktop
environment's keyboard-shortcut configuration:
- GNOME / Cinnamon: Settings → Keyboard →
Keyboard Shortcuts → Custom Shortcuts → Add. Command:
aftercalls --toggle-recording. Bind to Super+Shift+R. - KDE Plasma: System Settings → Shortcuts → Custom Shortcuts → Edit → New → Global Shortcut → Command/URL. Same command + binding.
- Hyprland: in
~/.config/hypr/hyprland.conf:bind = SUPER SHIFT, R, exec, aftercalls --toggle-recording - sway: in
~/.config/sway/config:bindsym $mod+Shift+r exec aftercalls --toggle-recording
The same pattern works for the Note-to-self shortcut by
replacing --toggle-recording with
--toggle-self-note.
Auto-detect Zoom / Teams / softphones
When auto-detect is on (default), the app watches the microphone for known call apps — Zoom, Teams, softphones, Slack, Discord — and pops a banner offering to record. You can accept, dismiss, or just wait it out. When the mic goes silent for 5 seconds the app prompts to end the recording.
Toggle in Settings → Behavior → Auto-detect calls.
Import an existing audio file
On the Record tab, click Import a file. Pick any audio file (wav, mp3, m4a, mp4, ogg, opus, flac, webm) and the app runs it through the same pipeline as a live recording — transcription, summarization, note writing.
Transcript, audio, and waveform
Click any call in the Calls tab to open it. The top half is the waveform + audio player; the bottom is the transcript. Click a transcript line to seek to that moment. Shift-drag on the waveform to mark a highlight.
The track selector (Everyone / You / Others) lets you listen to just your mic, just the other side, or both.

Rename speakers
Click any "Speaker A" pill in the participants block and type the real name. The rename cascades: transcript lines, summary, action items, and participants all update. This is per-call; voiceprint-based cross-call identification is on the roadmap.
"You" is the default label for your mic side. The app rewrites this to your first name during summarization so summaries read naturally ("Clayton agreed to...") instead of using "You".

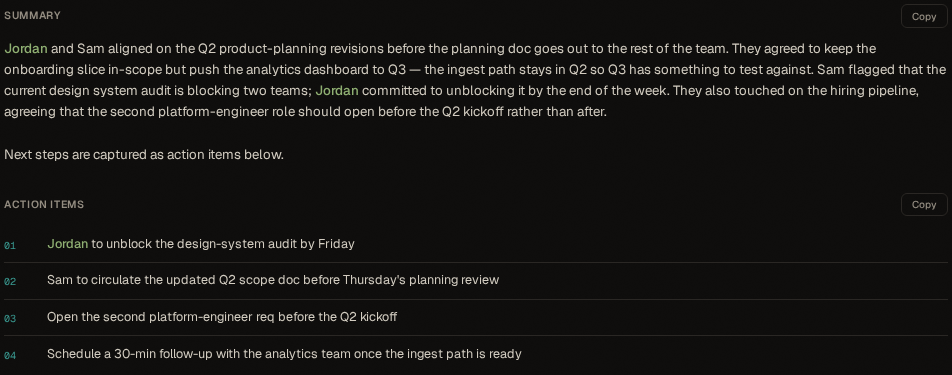
Summary + action items
The summary is written in third person with first names — paste straight into a recap email. Both summary and action items fill in live after transcription completes; you can start reading the transcript immediately.
Action items are opt-in per org. Admins toggle auto-generation in Settings → Org. When off, the Action items section on a call shows a "Generate" button — press it on the calls where you want action items, skip the cost on calls where you don't.
Highlights
Shift-drag on the waveform to mark a moment. Click a highlight to seek and label it (decision, follow-up, question, action, bookmark). The Auto-detect button runs an LLM pass that tags the obvious ones for you.

Download the audio
The Download button next to the playback-rate pill saves
whichever track you have selected (Everyone / You / Others)
as a .opus file named after the call. Opus
plays natively in Windows Media Player 10+, macOS, VLC, and
any modern browser — no transcode needed.
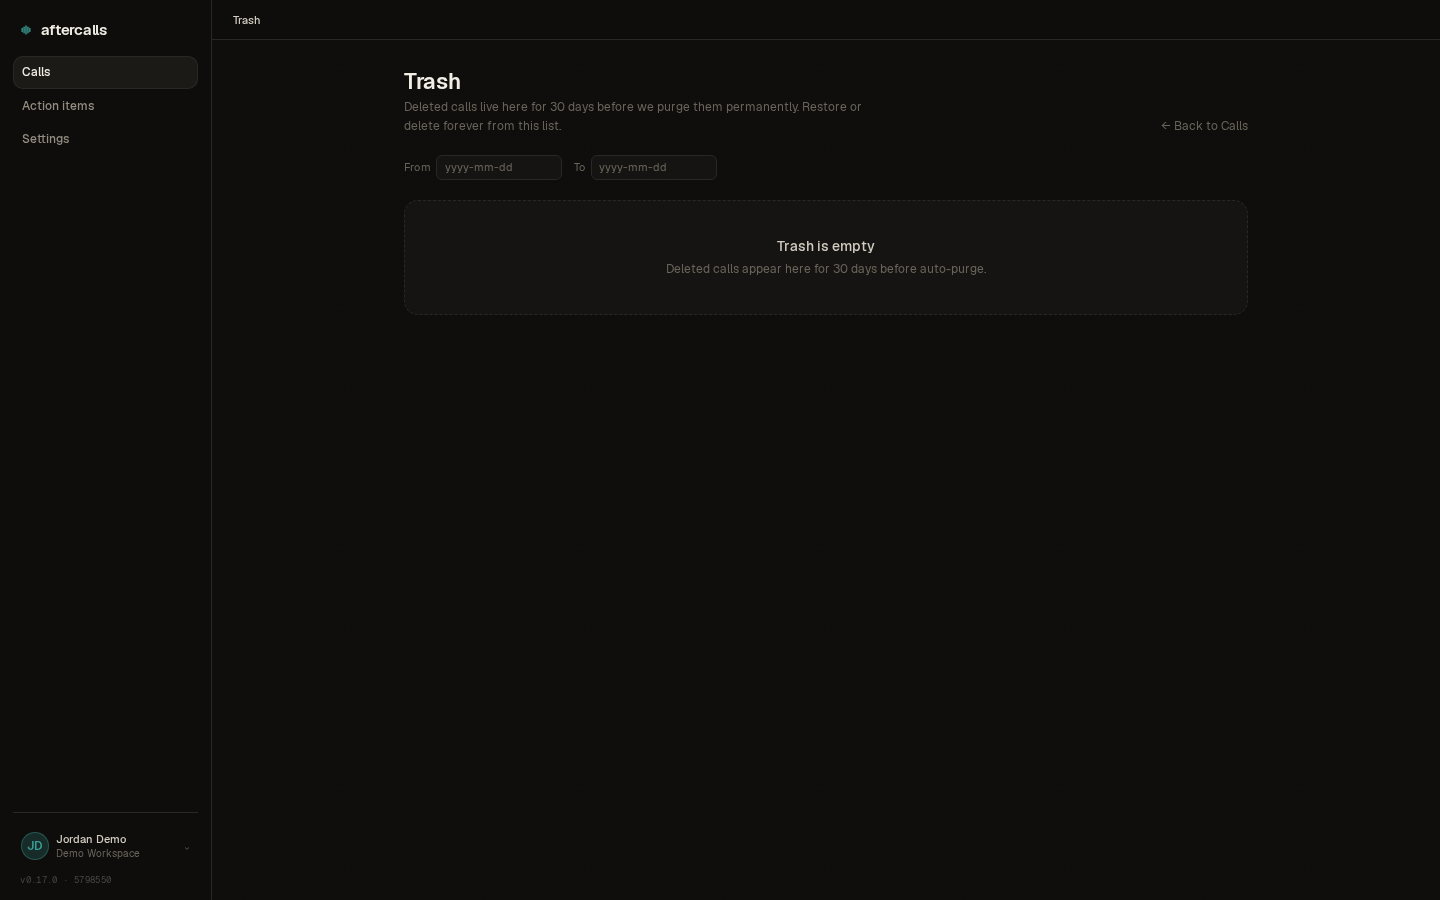
Delete + recycle bin
Deleting a call soft-deletes it into the trash. You have 30 days to restore it before the nightly purge wipes it permanently (audio files included). The Trash button on the Calls page takes you to the recycle bin where you can Restore or Delete Forever.
Admins can toggle between their own trash and the full team's via the scope switcher at the top of the page — the team view lists deletions across every member's calls and lets the admin restore anyone's call back to their owner. Restored calls land back on the original recorder's /calls list, not the admin's.
You can also Restore from the call-detail page itself: opening a deleted call from a deep-link or stale tab shows a Restore button inline so you don't have to navigate to the trash list first.
Account
Edit your display name, email (email changes require verification), and password from Settings → Account. Sign out from the same card or from the user menu that opens when you click your name.
If your org has enterprise SSO enabled, the same Settings → Account section lists your linked sign-in methods (Google Workspace, Microsoft Entra, Zoho) — connect a new one by signing out and picking the provider on the login page; remove an existing one with the Unlink button.
Theme
Dark, Light, or System. System follows your OS preference and flips automatically.
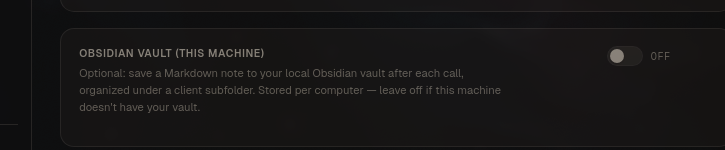
Obsidian vault (desktop app only, per-machine)
Opt-in: set a folder and the app drops a clean Markdown note after each call, bucketed by matched client. Leave it off and the note-writing step is skipped — everything else (audio, transcript, summary) still lands in the web portal.
The vault toggle is per-computer, not per-account: if you have aftercalls on a work laptop and a personal desktop, you can enable the vault on one and not the other.
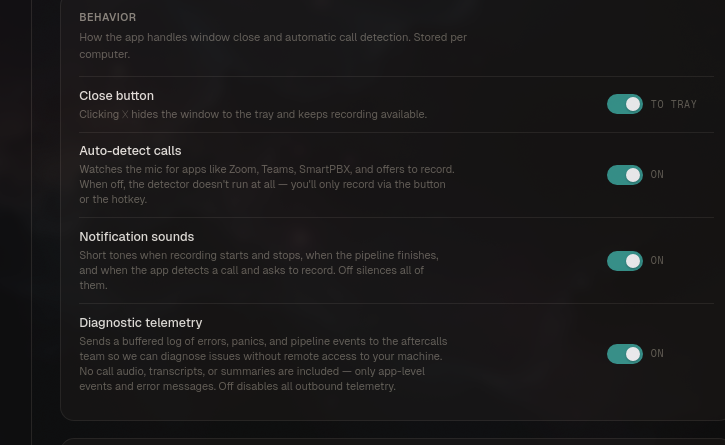
Close behavior + auto-detect + sounds + telemetry
Four toggles in Settings → Behavior:
- Close button: X-button minimizes to tray (default) or really exits the app.
- Auto-detect calls: watch the mic for Zoom / Teams / softphones. When off, no polling or prompts.
- Notification sounds: short synthesized chimes on record start / stop, pipeline complete, pipeline failure, and auto-detect prompts. On by default. Flip off for a silent agent.
- Diagnostic telemetry: ship error + pipeline events to the aftercalls team for bug diagnosis. No call audio, transcripts, or summaries are included. Off disables all outbound telemetry.
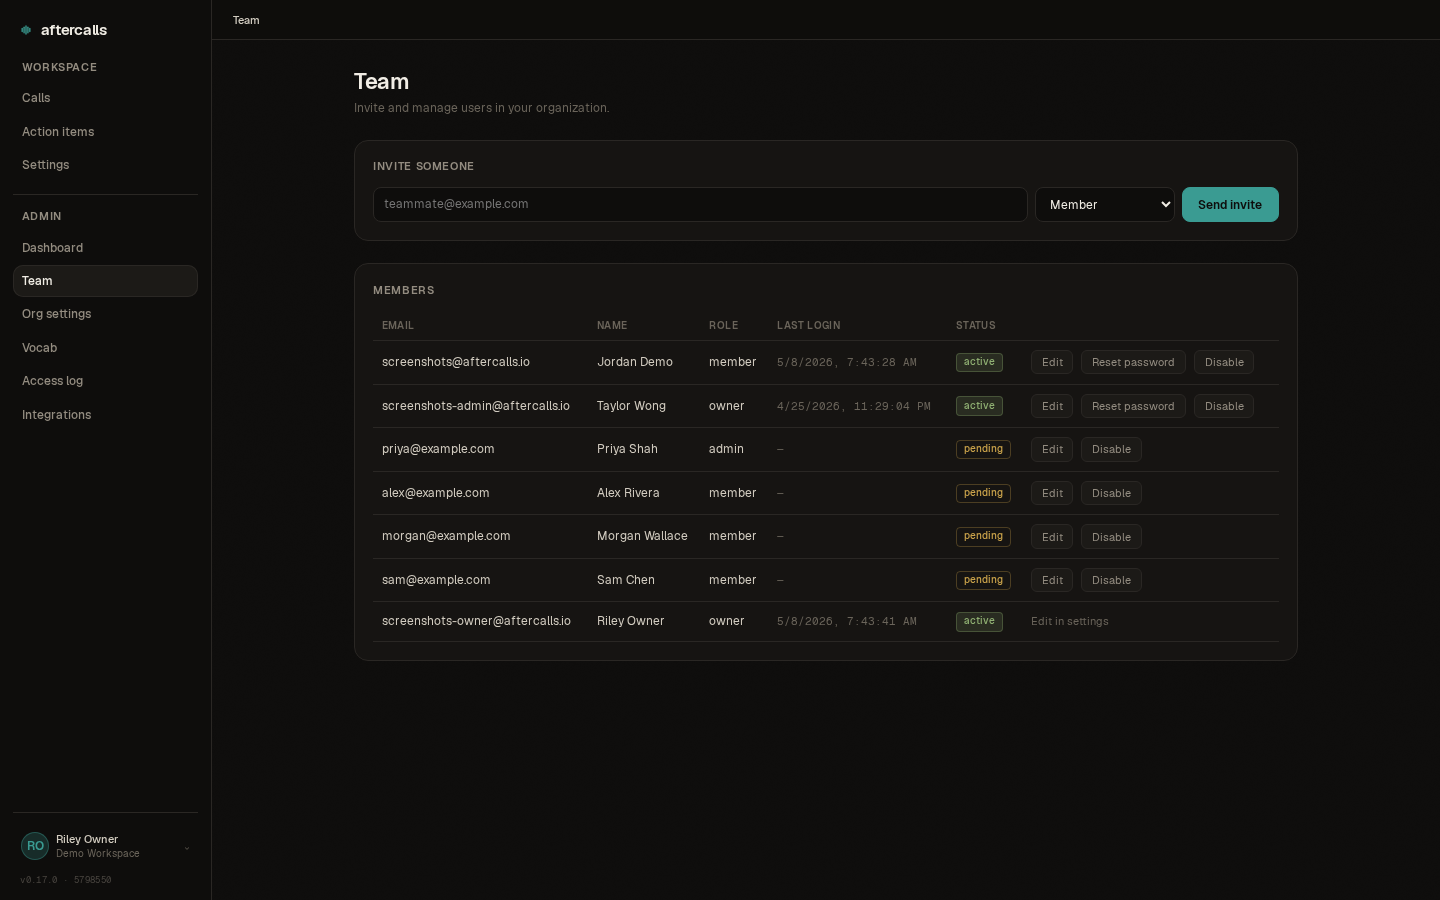
Team: invite, role, disable, delete
Admins see a Team tab in the portal nav. Invite by email, choosing member or admin role. Pending invites show in a list with revoke and resend buttons. Users can be disabled (kills all their refresh tokens, locks them out immediately) and then permanently deleted — a deliberate two-step to avoid accidental destruction.
Org vocab
Spelling corrections and word-boost hints applied to every call the agent processes. Useful for brand names, jargon, or terms the transcription model mishears consistently. Managed org-wide by any admin in the web portal.
Client-name allowlist
Manage which names in your calls are customers rather than teammates. Teach the app about your external contacts in Settings → Organization → Clients, and they'll render as plain text in summaries instead of being wrapped in participant chips.
You can auto-populate the list by opening any call, clicking an italic name chip, and selecting "Leave as text" — that name is added to your client allowlist immediately.
Auto action items (org-level)
Admins can toggle whether every call automatically generates action items, or whether users generate them on demand via the Generate button on a call's detail page. Off by default because action-item generation adds meaningful per-call processing cost — orgs that don't use them shouldn't pay for them.
Customize the AI
Admins can append guidance to the summary and action-items prompts under Settings → AI prompts. Teach the model your naming conventions, what to emphasize in summaries, or any other org-specific context.
Additions are append-only and length-capped to protect the format guarantees — the model will still generate valid summaries and action items even with your custom guidance added.
Recording: purpose and notification
In Settings → Recording, admins can set a recording notice that appears to users before they start recording. This is useful for letting team members know the purpose of recordings or reminding them of consent requirements in your jurisdiction.
Admins can also choose the notification mode: Off (no notification sound), User choice (each user picks in their settings), or Enforced (always play an audio notification when recording starts). Enforced is useful for teams in two-party-consent jurisdictions.
Call access log
Owners and admins can view a log of who has opened each recording inside the organization. The Access log page under the admin area shows which team member accessed which call and when.
Individual users still see their own per-call access list on each call's detail page — this admin view shows you the organization-wide access history.
Terms of Service audit (superadmin)
The Terms tab lists every published version of the Terms of Service and Privacy Policy, with accept counts and the acceptance roster (who accepted, when, from which IP and browser). Use the Publish-new-version form to push a new version; when Require every user to re-accept is on, existing users see the accept gate on next sign-in.
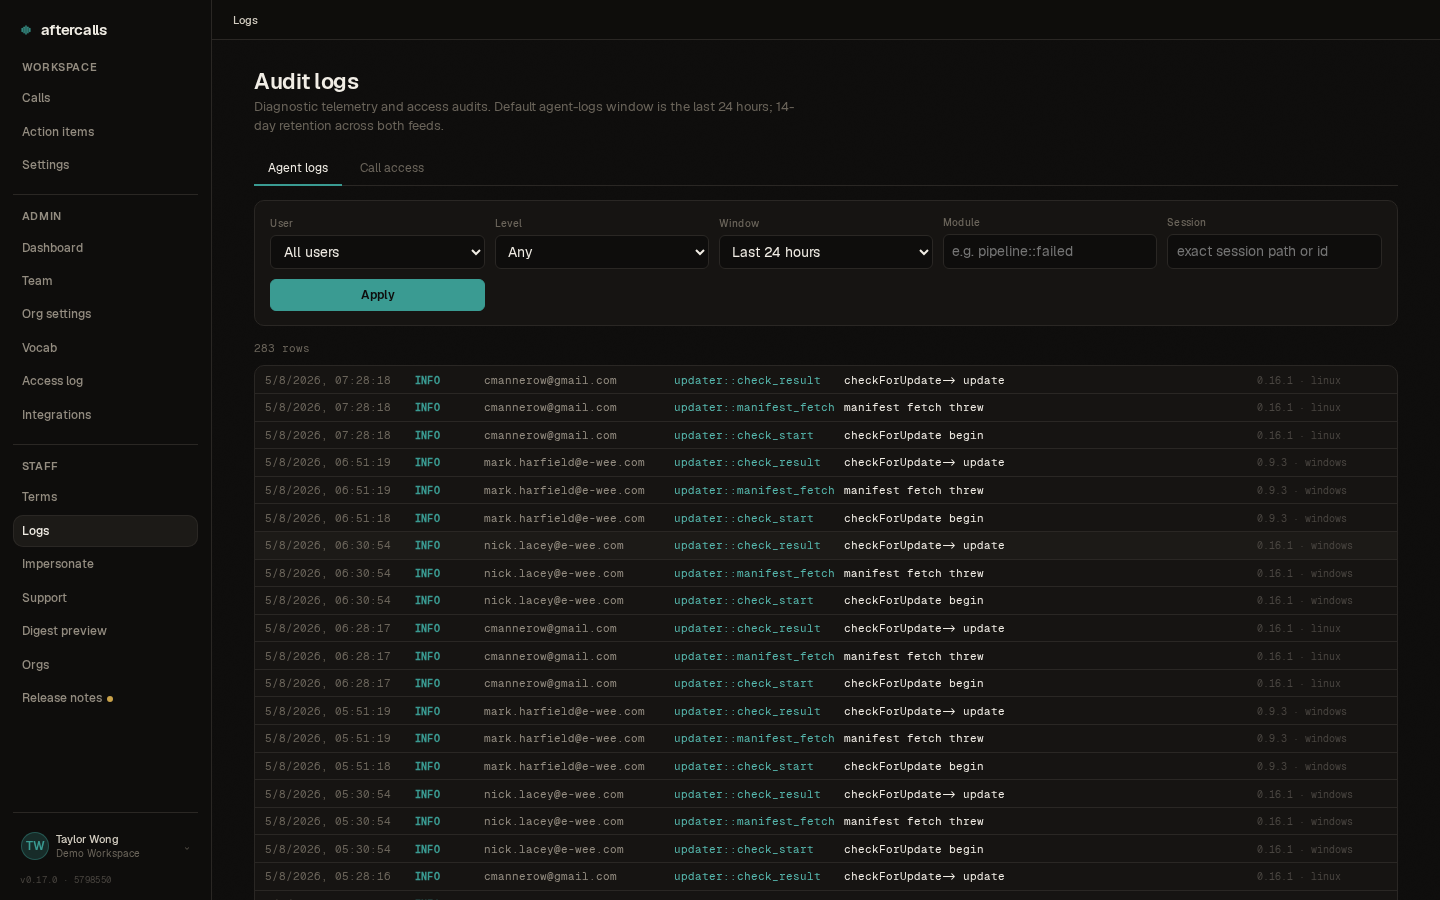
Agent logs (superadmin)
Diagnostic telemetry shipped by desktop agents lands here, filterable by user, level, module, call session, and time window. Click a row to expand its full JSON meta blob. Useful for debugging a user-reported issue without remote access.
Logs retain for 14 days and then auto-purge. Call audio / transcripts / summaries are never in telemetry — only app-level events and error messages.
Keyboard shortcuts
Press ? anywhere in the web app or desktop app to pop up a quick reference of the shortcuts that work on the current page. Esc closes the panel. Shortcuts fire only when you're not typing in a text input or note editor.
Global
- ? — open or close the shortcuts panel
- Esc — close the shortcuts panel or cancel an edit
Calls list
- j / k — next / previous call
- Enter or o — open the highlighted call
- / — focus the title filter
Call detail
- Space — play / pause audio
- ← / → — seek -10s / +10s
- Shift+← / Shift+→ — seek -30s / +30s
- , / . — playback speed -0.25× / +0.25× (clamped to 0.5×–2.0×)
Action items
- j / k — next / previous item
- Space — toggle the highlighted item between open and done
- e — edit the highlighted item's description
Recording (desktop app)
- Super+Shift+R — start / stop recording
- Super+Shift+N — start a note-to-self recording
The recording shortcuts are global — they fire even when aftercalls is in the tray. Both can be reassigned in Settings → Behavior on the desktop app. Linux users may need an extra step to make the global shortcut fire from outside the app.
Zoho Meeting (auto-import recordings)
If your team uses Zoho Meeting, aftercalls can pick up the cloud-recorded sessions automatically and turn each one into a call — same transcript, summary, and action items as a recording started from the desktop app.
Setup is per-user. In Settings → Integrations → Zoho Meeting, click Connect and authorize aftercalls against your Zoho account. From then on, finished Zoho Meeting recordings show up on your Calls list as candidates: an Import button promotes the candidate to a full call (transcribed and summarized like any other), or Dismiss hides it. Imported and dismissed candidates are filterable from the top of the Calls page.
Import is opt-in per call — the integration never automatically pulls a meeting in without you clicking Import. To turn the integration off entirely, disconnect it from the same settings page; existing candidates are dropped from your list.
Outbound webhooks
Outbound webhooks let you push aftercalls events to your own systems. Each org points at a single webhook destination URL; we POST a small JSON payload there when an event happens, signed with HMAC-SHA256 against a shared secret. Currently fired events: action_item.created, action_item.completed, and call.finalized. Failed deliveries (non-2xx responses) are retried with exponential backoff for 24 hours.
Webhooks don't have a self-serve admin page yet — to enable them for your org, email hello@aftercalls.io with your destination URL. We'll set up the secret with you and send back the payload spec. The integrations page on our marketing site shows the JSON shape.
What we collect (and don't)
We collect account basics (email, display name, hashed password), your call artifacts (audio, transcript, summary, action items, highlights, participant labels), and operational metadata (IP for security, TOS-acceptance audit trail, app-level diagnostic logs when telemetry is on).
We do not sell your data, and we do not train models on your calls. Transcription and summarization are performed by third- party sub-processors under contractual no-retention terms — your audio and transcripts are not retained on their systems after the request and are not used to train models. The full current list of categories of sub- processors is in our Privacy Policy.
Recording consent & jurisdiction
Recording-consent law varies by country, state/province, and sometimes by city. One-party consent (only you need to know) is the norm in many places; two-party consent (everyone on the call must agree) is required in California, Florida, Massachusetts, Pennsylvania, Washington, Illinois, Maryland, and elsewhere.
You are responsible for complying with the law in every jurisdiction your call touches. aftercalls does not automate consent. If you're unsure, don't record until you've asked a qualified attorney. Our Terms of Service spell this out in section 3.
Export and delete your data
You can delete individual calls from the call-detail page — deleted calls go to the recycle bin for 30 days, then auto-purge (including the audio in object storage).
For full account export or immediate hard-delete across everything, contact us at hello@aftercalls.io. We respond within 30 days (usually within 24 hours). Admins can act on behalf of users in their org subject to applicable law.